


For our programs, I knew I wanted a 6x6 square booklet. The wedding colors were ivory and gold, with a lace and pearls motif running through everything, so the programs had to reflect that.
I started with the insides of the program, brainstorming content and page size. Based on our program cover size of 6x6, I wanted the inside pages to be 5.5 x 5.5 when folded, to leave a margin. That meant the two page spread would be 5.5 tall x 11 inches wide on the computer screen. I planned to print these at home on 8.5 x 11 paper, so I knew I would need to leave a large bottom margin that I would later cut off.
So I opened a Microsoft Word document, set my page to landscape, and set my margins to .3 on the left and right, .4 on top, and 2.5 on the bottom. I formatted the page to have two columns.
I wanted four pages in the program:
1. Order of ceremony
2. Wedding participants
3. Explanation of traditions (we are interfaith, so the explanation helps if anyone's unfamiliar with something)
4. Thanks/In remembrance
I scribbled a little mini booklet on a piece of paper and folded it to see where everything needed to lay when printed in order to fold correctly, and came up with this order.

Printing these was a breeze. I wanted to print double sided, so Mr. B loaded his printer up, printed 225 copies of the first page, turned everything upside down and backwards (you may want to do a few test prints to see how your printer works), and reprinted the with page 2 on the back. We used resume paper, as it is not see through, and gives the programs a nice heft. I would not use standard printer paper for this project.
Then, we had to cut off the extra big margin on the bottom. That took a cutting board, razor, and a little bit of time. (And a Sam Adams to keep from boredom, though I'm not sure that helped me cut any straighter).

When it was done, I used a bone folder to fold the programs in half, and we wound up with the finished insides:

Open inside spread
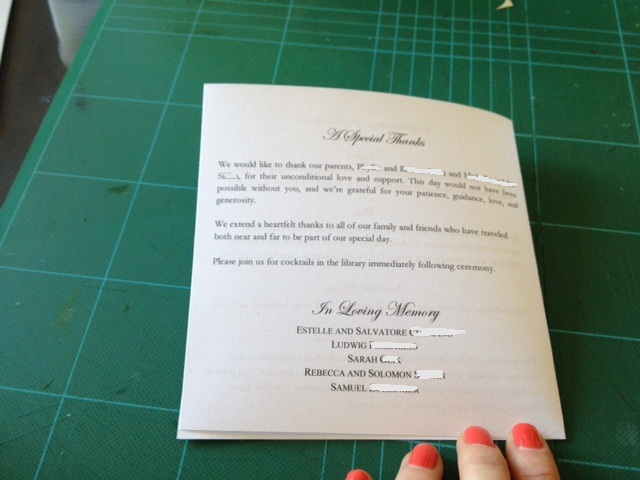
Back page- thanking our parents and remembering deceased grandparents
When they were done, I stacked them up and placed one of my heaviest shower gifts (a giant toaster oven that I still need to return) on top of them to keep them nice and flat.

The covers had our names, wedding date, and wedding location.
A heads up if you go this route, it's not exactly budget friendly. 225 covers cost me $186, and that is before the cost of resume paper, embellishments, and tools used.
To keep up with our lace and pearls theme, I purchased a beautiful lace from MJ Trim here in New York City. Unfortunately, there was no name or style number printed on it, but here's what it looked like:

I cut 225 strips that were about 6 and 1/4 inches- I wanted the lace to be longer than the program.
We formed an assembly line. My mom attached the covers and the insides using a long reach stapler, which I think is a great way to make booklets. The long reach stapler allows you to set the size so that you can staple papers up to 12 inches long, rather than using a conventional stapler, which wouldn't have reached the binding.
After stapling, she handed the programs off to the rest of us, who used Mod Podge and paintbrushes to apply the lace. We applied it to the front cover and folded it over the spine to hide the staples and leave a border near the spine on the back cover.
Since the lace strips were longer than the program, once the glue dried we just cut the extra edges off, which gave us a nice straight cut. That way, you don't have to worry about cutting the lace straight at the beginning.
The finished product (also displayed on a heinous tablecloth, sorry!)

I'm very pleased with how they came out. They're definitely of a more formal and less trend-forward rustic look, and they were a heck of a lot of work, but I'm glad we did them.
If you're going to attempt a similar project my only advice would be to literally start four months in advance. By the time I got all our text together (and verified by our officiants), designed everything in Word, and ordered sample programs, it was already mid April, and I'd started the project in January.
I can't really say whether or not this was worth it, except that I genuinely enjoyed working on the project. It certainly saves no time, is not any cheaper than using Paper Divas or some similar source, but it was fun for me to be really involved in all the elements of the wedding. I think our guests enjoyed reading them as well (though, obviously, they were all left behind on the seats- no one cares that much!)
No comments:
Post a Comment